I thought I would show the difference between French Beading and Victorian Beading.
I always thought they were the same thing, but I've since discovered I was wrong.
I made similar flowers using the 2 different methods to show the difference. I'll probably make some tutorials soon.
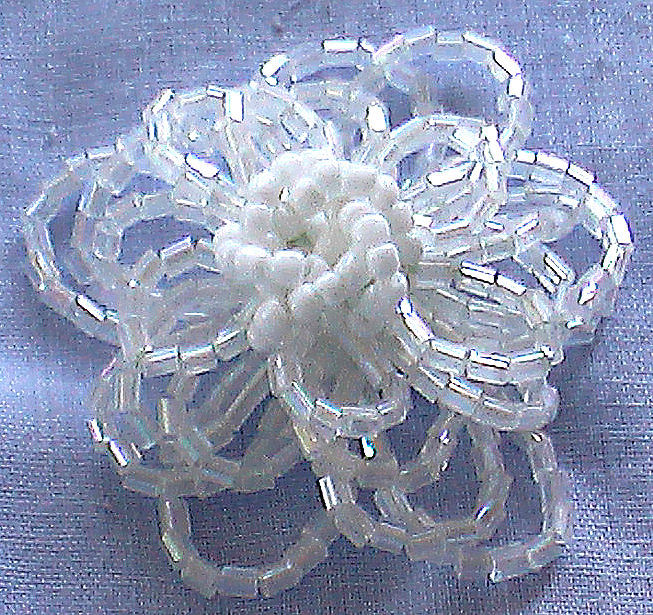
Victorian beaded flower
Victorian Beading is made similar to ladder stitch and has similarities to Right Angle Weave. Is is made with horizontal lines of beads and both ends of the wire go through the whole row. There are more or less beads added to each row, to create the shape of the petal. This method can also be used to make the 3D animals that I showed in a previous post. They were made by every alternate row being behind the other, in a zigzag pattern to create the back and front.
Victorian beaded rose
Victorian beaded rosebud
Victorian beaded daffodil
Victorian Beading is also know as English or Continental Beading.
Victorian beaded flower
French Beadingis done with rows of beads that are twisted onto a separate section of wire at the top, then the row of beads is passed down the other side, and to another section at the bottom, where it is twisted around again and then goes back to the top. This is shown in the lillium flower.
Another way of doing it is to twist a long row of beads together at the ends, shown in the rounded petal flowers.
French beaded rose
French beaded rosebud
French beaded flower
With French Beading all the beads are thread onto the wire before beginning, and the wire is left on the spool and not cut till the end.
At first I thought this beading style was another type of French Beading, but I've since discovered it's actually Victorian beading. They're similar, but French Beading is created with the wires twisting at each row end, whereas Victorian beading is more like Right Angle Weave.
I just love the wonderful 3D animals that can be made with this weave, they just look so good. They're very much like the Beadies that's popular with kids, but this is a bit more difficult and creates three dimensional objects instead of just flat ones.
I'll have to do some more French beading soon too!
150cm fishing line,
100 gold size 8/0 hex beads (also known as 2 cut beads)
200 red size 8/0 seed beads
35 black size 8/0 seed beads
1 ivory 6mm imitation pearl
Techniques: Beadweaving, right angle weave
Difficulty: Medium, knowledge of right angle weave is required
Step 1: Ball base: Start with 5 beads, crossover on the last one (bead 5)
Step 2: Add beads 6, 7, 8 and 9 onto the blue thread. Cross through bead 9 with the green thread.
Step 3: Add beads 10, 11 and 12 onto the green thread. Cross through bead 12 with the blue thread.
Step 4: Add beads 13, 14 and 15 onto the blue thread. Cross through bead 15 with the green thread.
Step 5: Add beads 16, 17 and 18 onto the green thread. Cross through bead 18 with the blue thread.
Step 6: Pass the green thread through beads 1 and 6.
Step 7: Add beads 19 and 20 on the blue thread. Cross the green thread through bead 20.
Step 8: Pass the blue thread through bead 7.
Step 9: Add beads 21, 22 and 23 on the green thread. Cross the blue thread through bead 23
Step 10: Pass the green thread through beads 8 and 10.
Step 11: Add beads 24 and 25 to the blue thread. Cross the green thread through bead 25.
Step 12: Pass the blue thread through beads 11 and 13.
Step 13: Add beads 26 and 27 on the green thread. Cross the blue thread through bead 27
Step 14: Pass the green thread through beads 14 and 16.
Step 15: Add beads 28 and 29 to the blue thread. Cross the green thread through bead 29.
Step 16: Pass the blue thread through beads 17, 19 and 21.
Step 17: Add bead 30, and cross over.
Step 18: Take the blue thread and pass through beads 28 and 26.
Step 19: Take the green thread and pass through beads 22 and 24.
Step 20: Tie off, but leave the thread. The base is done. It should look like a ball with lots of holes.
Now you will add the petals.
The diagram shows where the petals need to be added, basically there will be 3 rows on the beaded base. The first and last rows will have 5 beads, the middle row will have 10 beads.
Step 21: For the first row, just pass ONE thread through the bead next to it. You will be working with this thread only for now. And you will be working on this circle of 5 beads, which will be outer row of petals, and is highlighted in yellow.
Step 22: Thread on 20 gold hex beads, and then pass the thread back through the bead on the base where you started, to create a loop of beads. (The thread path for the first row of petals is shown in the diagram). Pass the thread into the next bead in the circle, add 20 gold hex beads, and loop it back through again. Continue this all the way around the circle of 5 beads on the base.
Step 23: At this stage I like to add a brooch back, if I’m using one, then tie off the thread.
Step 24: Now pick up the other thread and pass it through to a bead in the next row. This second row is highlighted in pink, and will have 10 beads in it. Note: this row of beads doesn’t sit perfectly straight, but has a slight zigzag pattern to it.
Step 25: This time add loops of red size 8/0 beads, I used 20 because the seed beads are smaller than the hex beads, but play it by ear these loops should be a little smaller than the loops in the last row. Make this row like before, passing through a bead, adding the beads for the petals, and passing back through that bead, then pass into the next bead. Continue all the way around forming 10 overlapping petals.
Step 26: Now you’ll be up to the last row, which will have only 5 beads in it again. This row is highlighted in green. This time add only 7 black seed beads to each of the five beads on the base.
Step 27: To make the flower centre, bring the thread from the bottom of the work up through the centre of the base, add the pearl bead, and cross the other thread through the pearl. Pass each thread through a bead near it, as in the diagram.
Weave the threads through some beads until the threads meet. Tie off and cut.
Your beaded flower is now finished!
VARIATIONS: You can use seed beads or any other beads in any of the rows, but each inner row just needs to be a little smaller than the outer ones. You can also leave out the centre pearl, to give a different look to your flower.
So here's the Cellini spiral. I've used size 10 seed beads in olive green, then size 8 seed beads in silver-lined lime green, and gold silver-lined seed beads in size 6. The pearls are 4mm greens. I've made it gradually narrower towards the back.
And this is the other spiral rope that is basically an embellished right angle weave.
I'll be photographing the other dutch spiral soon, and I'm making a tight spiraled herringbone rope as well and then I think that will be all the spirals there are.


