150cm fishing line,
100 gold size 8/0 hex beads (also known as 2 cut beads)
200 red size 8/0 seed beads
35 black size 8/0 seed beads
1 ivory 6mm imitation pearl
Techniques: Beadweaving, right angle weave
Difficulty: Medium, knowledge of right angle weave is required
Step 1: Ball base: Start with 5 beads, crossover on the last one (bead 5)
Step 2: Add beads 6, 7, 8 and 9 onto the blue thread. Cross through bead 9 with the green thread.
Step 3: Add beads 10, 11 and 12 onto the green thread. Cross through bead 12 with the blue thread.
Step 4: Add beads 13, 14 and 15 onto the blue thread. Cross through bead 15 with the green thread.
Step 5: Add beads 16, 17 and 18 onto the green thread. Cross through bead 18 with the blue thread.
Step 6: Pass the green thread through beads 1 and 6.
Step 7: Add beads 19 and 20 on the blue thread. Cross the green thread through bead 20.
Step 8: Pass the blue thread through bead 7.
Step 9: Add beads 21, 22 and 23 on the green thread. Cross the blue thread through bead 23
Step 10: Pass the green thread through beads 8 and 10.
Step 11: Add beads 24 and 25 to the blue thread. Cross the green thread through bead 25.
Step 12: Pass the blue thread through beads 11 and 13.
Step 13: Add beads 26 and 27 on the green thread. Cross the blue thread through bead 27
Step 14: Pass the green thread through beads 14 and 16.
Step 15: Add beads 28 and 29 to the blue thread. Cross the green thread through bead 29.
Step 16: Pass the blue thread through beads 17, 19 and 21.
Step 17: Add bead 30, and cross over.
Step 18: Take the blue thread and pass through beads 28 and 26.
Step 19: Take the green thread and pass through beads 22 and 24.
Step 20: Tie off, but leave the thread. The base is done. It should look like a ball with lots of holes.
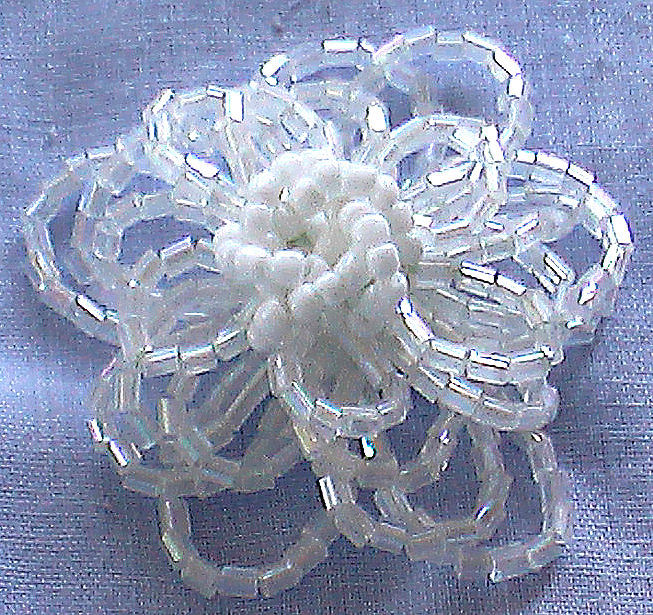
Now you will add the petals.
The diagram shows where the petals need to be added, basically there will be 3 rows on the beaded base. The first and last rows will have 5 beads, the middle row will have 10 beads.
Step 21: For the first row, just pass ONE thread through the bead next to it. You will be working with this thread only for now. And you will be working on this circle of 5 beads, which will be outer row of petals, and is highlighted in yellow.
Step 22: Thread on 20 gold hex beads, and then pass the thread back through the bead on the base where you started, to create a loop of beads. (The thread path for the first row of petals is shown in the diagram). Pass the thread into the next bead in the circle, add 20 gold hex beads, and loop it back through again. Continue this all the way around the circle of 5 beads on the base.
Step 23: At this stage I like to add a brooch back, if I’m using one, then tie off the thread.
Step 24: Now pick up the other thread and pass it through to a bead in the next row. This second row is highlighted in pink, and will have 10 beads in it. Note: this row of beads doesn’t sit perfectly straight, but has a slight zigzag pattern to it.
Step 25: This time add loops of red size 8/0 beads, I used 20 because the seed beads are smaller than the hex beads, but play it by ear these loops should be a little smaller than the loops in the last row. Make this row like before, passing through a bead, adding the beads for the petals, and passing back through that bead, then pass into the next bead. Continue all the way around forming 10 overlapping petals.
Step 26: Now you’ll be up to the last row, which will have only 5 beads in it again. This row is highlighted in green. This time add only 7 black seed beads to each of the five beads on the base.
Step 27: To make the flower centre, bring the thread from the bottom of the work up through the centre of the base, add the pearl bead, and cross the other thread through the pearl. Pass each thread through a bead near it, as in the diagram.
Weave the threads through some beads until the threads meet. Tie off and cut.
Your beaded flower is now finished!
VARIATIONS: You can use seed beads or any other beads in any of the rows, but each inner row just needs to be a little smaller than the outer ones. You can also leave out the centre pearl, to give a different look to your flower.
So here's the Cellini spiral. I've used size 10 seed beads in olive green, then size 8 seed beads in silver-lined lime green, and gold silver-lined seed beads in size 6. The pearls are 4mm greens. I've made it gradually narrower towards the back.
And this is the other spiral rope that is basically an embellished right angle weave.
I'll be photographing the other dutch spiral soon, and I'm making a tight spiraled herringbone rope as well and then I think that will be all the spirals there are.
I seem to have trouble with my camera to USB connection so I couldn't list the photos from the camera yet. Just before I found out I could use the memory card in the lap top then move them over to the PC to edit and post. Thanks to Vedasbeads from Twitter.
So here are the photos of the freeform bracelet I made. It was so much fun making it.
60cm fishing line.
32 x 3mm (size 8/0) pink seed beads
36 x 3mm (size 8/0) blue seed beads
Techniques: Beadweaving, right angle weave
Difficulty: Medium
FRONT
Start at circle A, thread on 1 blue and 2 pink beads, crossover threads at bead 3. Continue circles B and C in this manner following bead circles and bead numbers, and keeping an eye on thread colours and bead colours.
At circle D be sure to add beads only on the blue thread, then cross over at bead 12. Follow the pattern up to circle G.
For circle H, again be aware of the beads only on the one thread, and crossover on bead 23. This starts the next row of the pattern.
At circle I watch the numbers and the threads, the red thread needs to go back in to a bead that you added before.
Continue in this manner for the rest of this diagram, pulling tight regularly.
You will notice the beading will want to curve a bit, allow this curve to come outwards towards the front. It should look a lot like the actual diagram.
TOP
You will now be working the top of the heart. The darkened beads means they’re already in there, and just need to be threaded through again.
Both threads will be coming out of bead 37, all that’s needed here is to add 3 blue beads to the blue thread, and cross over the last bead with the red thread.
Circle B needs the blue thread to go into the very first pink bead that you started the beading with in the front section (darkened), and just one pink bead is needed to crossover.
Continue in this way picking up beads from the front section whenever a shaded bead is shown.
Circle D needs 2 beads picked up from the front section.
Circle G is the turnover circle, where only the one thread has beads added.
Continue with the next row. Pulling tight regularly.
The piece should pull together at the top, so that you should now have a backless three dimensional heart shape.
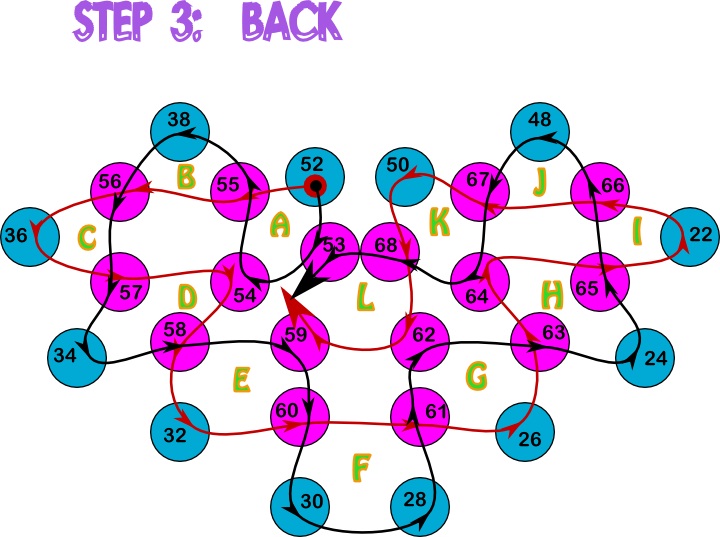
BACK
You now need to turn the piece over to work the back.
All the outer beads are already here, and need to be picked up for every bead circle, except the last one.
Both threads will be coming out of bead 52. Bead circle A has pink beads only on the red thread.
Continue working along the edge, picking up beads from the previous sections and following bead circle letters, and bead numbers, and colours of beads and threads.
Circles D and K pick up beads previously added in this section, as well as previous sections (so watch the numbers).
Circle L doesn’t pick up any new beads at all, it just picks up the beads added earlier to form this last bead circle.
Optional
You can thread an extra bead in each middle section of the filled in colour. If you use the same size bead, it will stand out higher, as in the photo. You can also use a smaller size bead for a subtler effect.
You can also make this with bicones, or any other size beads.