Just a reminder to everyone.
Donations are always welcome, and really appreciated.
I have had free patterns downloaded over 7,000 times. If some of you just donated a small amount for each free pattern, it would be really helpful.
Donations are very easy to do through Paypal, and you don't even have to sign up.
Updated to add: the free patterns are still always free on the blog whether you donate or not
Showing posts with label beading. Show all posts
Showing posts with label beading. Show all posts
Monday, April 13, 2015


Friday, December 5, 2014
Christmas Sale
Everything listed in my Artfire shop is 25% off until January 2015.
Find them here: Craft Cove on Artfire
There are many things to buy. Crochet items such as: Santa hats,

Christmas diaper covers

Elf hats

Doilies

Beaded Jewellery

Beaded Animals

Beaded Flowers

Chainmail

And much more.
Find them here: Craft Cove on Artfire
There are many things to buy. Crochet items such as: Santa hats,
Christmas diaper covers
Elf hats
Doilies
Beaded Jewellery
Beaded Animals
Beaded Flowers
Chainmail
And much more.
Sunday, April 15, 2012
Lots of things
I've been doing all sorts of things lately. I've been finding crochet the most soothing, and I can do that at night.

I find beading difficult to do at night, because I get lots of glare and shadows from lamps, and there's too many bits and pieces to keep track of.
I've made a few different crochet earrings, but I'm still in the process of stiffening them. Then I'll take photos.
I'll be doing a tutorial on a blocking board soon, and maybe some information on blocking and stiffening crochet.
I've also made some wire ear cuffs and slave earrings, I just haven't photographed them yet.
Crochet baby clothes will be coming soon too.
I have so many ideas, but never enough time.
Friday, July 31, 2009
Sale at Shop Handmade Store


For this month I'm having my sale at my Shop Handmade store.
There are 9 items listed and they are all 10% off. There's a bit of everything listed including, chainmail, wirework, beadweaving, and a beaded rose bud.
The sale is for all of August only.
See them here Shop Handmade
Friday, June 12, 2009
Victorian Beading
 | ||
| Victorian beaded dog |
 |
| Victorian beaded monkey |
 |
| Victorian beaded monkey |
 |
| Victorian beaded duck |
At first I thought this beading style was another type of French Beading, but I've since discovered it's actually Victorian beading. They're similar, but French Beading is created with the wires twisting at each row end, whereas Victorian beading is more like Right Angle Weave.
I just love the wonderful 3D animals that can be made with this weave, they just look so good. They're very much like the Beadies that's popular with kids, but this is a bit more difficult and creates three dimensional objects instead of just flat ones.
I'll have to do some more French beading soon too!
Sunday, June 7, 2009
Another spiral
Here's another type of spiral I've just finished. This time it's a different type of "Dutch Spiral".
I used a variety of purples and reds for this necklace, and I've tapered towards the back.
I made a spiral clasp to match the piece as well.
This will be available to buy from my web site very soon.
Craft Cove
 |
| Dutch spiral |
 |
| Dutch spiral |
I used a variety of purples and reds for this necklace, and I've tapered towards the back.
I made a spiral clasp to match the piece as well.
This will be available to buy from my web site very soon.
Craft Cove
Monday, June 1, 2009
25% off selected bracelets
I'm having a sale this month for a massive 25% off these selected handcrafted beaded bracelets.


See my website for more information: Handcrafted jewellery from Australia
 |
| beaded bracelet |
 |
| stretch cuff |


See my website for more information: Handcrafted jewellery from Australia
Monday, May 25, 2009
More Spirals again

So here's the Cellini spiral. I've used size 10 seed beads in olive green, then size 8 seed beads in silver-lined lime green, and gold silver-lined seed beads in size 6. The pearls are 4mm greens. I've made it gradually narrower towards the back.


I'll be photographing the other dutch spiral soon, and I'm making a tight spiraled herringbone rope as well and then I think that will be all the spirals there are.
More spirals are listed here:
http://craftcove.blogspot.com/2010/04/all-spirals.html
Wednesday, May 20, 2009
New listings on my website
Here's some of my latest work that I've just listed on my website
 |
| 3d beaded teddy |
 |
| 3d beaded basket |
 |
| 3d beaded elephant |
 |
| 3d beade basket |
 |
| beaded flower brooch |
 |
| spiral rope necklace |
 |
| cellini spiral |
 |
| triangle weave |
 |
| raw spiral bracelet |
Friday, May 1, 2009
Huge Sale on my web site this month!
A HUGE 10% DISCOUNT OFF ALL ITEMS! NOT TO BE MISSED!
Craft Cove is having a sale. This months special is for 10% off EVERY item in my jewelry store!
Craft Cove has a huge collection of unique handcrafted jewelry and gifts for sale. Including beadweaving, chainmail jewellery and wirewrapping. There are necklaces and chokers, bracelets, earrings, 3d ornaments and animals, keyrings, even amulet bags, all in many different types of weaves.
Everything in Craft Cove is entirely handcrafted by Jenny Lawson here in Australia.
For all of May EVERY item is discounted by 10%. Only till the last day of May, so don't miss out.
http://craftcove.weebly.com
craftcove@gmail.com
Craft Cove is having a sale. This months special is for 10% off EVERY item in my jewelry store!
Craft Cove has a huge collection of unique handcrafted jewelry and gifts for sale. Including beadweaving, chainmail jewellery and wirewrapping. There are necklaces and chokers, bracelets, earrings, 3d ornaments and animals, keyrings, even amulet bags, all in many different types of weaves.
Everything in Craft Cove is entirely handcrafted by Jenny Lawson here in Australia.
For all of May EVERY item is discounted by 10%. Only till the last day of May, so don't miss out.
http://craftcove.weebly.com
craftcove@gmail.com
Friday, April 24, 2009
Netted Star

NETTED STAR
Materials: 4mm crystals, or other beads
Size 10/0 seed beads
Stopper bead, any color, will be removed later.
Fine fishing line, approximately 80cm
Beading needle, or other fine needle
1. Thread the fishing line onto the needle
2. Tie on a stopper bead. A stopper bead is a bead the same size or smaller than the smallest bead you are using. String through it twice to hold it in place.
3. Add 6 seed beads, 1 crystal and 1 seed bead.
4. Go back through the crystal, and pull tight.
5. String on another 6 seed beads, a crystal, and this time 4 seed beads.
6. Go back through the first seed bead you strung on, through the same way you came from originally. Then back through the crystal.

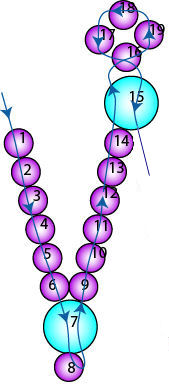
7. Continue in this manner, adding 6 seed beads between each section, crystals next to each end, and ends alternating between a single seed bead, and a 4 seed bead circle.
8. This should form a zigzag pattern with the 4 bead circles on one end, and the single beads on the other, as in the diagram.
9. Stop when you have 6 of each types of ends. 12 points all together.

10. The thread should now be coming out of the crystal, in readiness for the 6 seed bead centre. Now instead of starting a new 6 bead section, just string back through the first section, all the way through the first 6 seed beads, the crystal, and the end seed bead.
11. You should now have a rough circle. String through the next single seed bead, at the next point, then the next. Continue through them all. Then go through them all again.


12. Tie off, and thread through a few beads. Remove stopper bead, tie, and thread through a few beads.
Please
consider making a donation
Created by Augenia (Jenny) Lawson
For any questions, email me at: hello@craftcove.au
More tutorials can be found on the Craft Cove blog and in my Ravelry shop.
Please do not distribute, lend or copy any parts of this pattern.
Do not mass produce items made with this pattern.
Copyright © 2016 Augenia (Jenny) Lawson (Craft Cove)
Tuesday, April 21, 2009
Free Tutorials coming soon
I'll be moving all my free tutorials from my website to my blog soon.
I'll start with the oldest one, and gradually I'll be adding the brand new ones to the blog, rather than my web site.
These will be all my own creations and my own patterns.
Have fun
I'll start with the oldest one, and gradually I'll be adding the brand new ones to the blog, rather than my web site.
These will be all my own creations and my own patterns.
Have fun
Thursday, April 9, 2009
Freeform Madness
 |
| freeform bracelet |
I'm giving the spirals a rest for a while. The cellini and Dutch spirals are both being made into necklaces so they take a little while to do. I find it helpful to take a break from work that takes too long, if I don't have a timetable for it, then I can come back to it fresh, or just do little bits as it takes my fancy.
I finished the other spiral rope which is really an embellished right angle weave. I wasn't too happy with it, so I gave it to my daughter, and tried different beads. More on this next time.
I've never done any freeform work before, so I thought I'd give this a go. It was a bit scary at first, the base was a bit crooked, but they say it's supposed to! Then I wasn't sure if everything should sit flat against the base. And I wasn't sure what to put where, or how to do it.
 |
| freeform beading |
I started putting the bigger beads on, then gradually added some bridges, and I wasn't really sure this was going to work, it didn't look so good. I thought I'd just keep going, I added more beads, more bridges, then I was on a roll. All of a sudden it was taking shape. I added more of this and that. By now I loved doing it and I kept thinking of more interesting things to do with it. And believe it or not, I actually loved the look of it! Bummer! I promised my daughter she could have it, when I wasn't so sure how good it would look.
Anyway, I've nearly finished it. So I'll take a photo to post before she has it. But I'll definitely make some more. I'll post the photos of it next time.
 |
| freeform beading |
Tuesday, May 27, 2008
Free Tutorials
Patterns & Tutorials
Here you'll find my free patterns and tutorials covering crochet, jewellery, beadweaving and other crafts.
All of the patterns and tutorials on this page are my own designs and are free to use for your personal crafting.
If you enjoy my patterns and tutorials and would like to support Craft Cove, donations are always very much appreciated.
Crochet


Jewellery
How to wear an ear cuff

Start at the top of the ear where the ear is thinner. Slide the cuff downwards over the cartilage, while turning it towards the front.
The cuff will sit from the outside of the ear, and over both sections of cartilage on the middle part of your ear.
Squeeze the ring section slightly, if necessary to get a snug fit. This is only necessary before the first use.

Subscribe to:
Posts (Atom)