I've created some new squidoo lenses.
http://www.squidoo.com/craftcove
http://www.squidoo.com/hair-fascinators
http://www.squidoo.com/free-star-tutorial
http://www.squidoo.com/beginners-jewellery-making-
http://www.squidoo.com/free-beaded-flower-tutorial
http://www.squidoo.com/beaded-wedding-flowers
Some people seem to like squidoo more than other places. This is for you
Showing posts with label free tutorials. Show all posts
Showing posts with label free tutorials. Show all posts
Tuesday, August 31, 2010


Wednesday, December 16, 2009
Free Tutorials
If you've used my free tutorials, I'd love to know. Please add comments at the end of the tutorial you followed, or at the end of this post.
I need to know if they are of value to people.
Let me know how well they worked out. Was it easy to follow? Any other comments?
Also, do you want more of them?
If you can spread the word, that would be great too.
I need to know if they are of value to people.
Let me know how well they worked out. Was it easy to follow? Any other comments?
Also, do you want more of them?
If you can spread the word, that would be great too.
Thursday, August 6, 2009
Victorian Beaded Flower


Victorian Beaded Flower Tutorial
Materials: Size 10/0 seed beads
1 x 6mm bead
28 gauge wire
Green floral tape
Stiff stem wire (optional)
32 gauge wire (optional)
Techniques: Victorian Beading
Difficulty: Medium
Step 1:

Cut 50 – 60 cm of the wire. Thread on 10 beads (4 for first row, and 6 for second row).
Take one end of the wire and go back through 6 beads from the opposite end of the wire, keeping them centred as much as possible.
Form a circle, by bending the beaded wire backwards, and pulling the wires taut. Try not to leave any space in the wire.
Bend both ends of wire to face past the second row.
Thread the beads for the 3rd row (10 beads) onto either wire end, pass the other end of the wire through all 10 beads. Bend as necessary, and pull taut.
Step 2:

Continue in this fashion, starting from the bottom of the chart. Follow the number of beads per row, (You’ve done the first 3 rows) and bend and pull taut at the end of each row. (Don’t worry too much about the shape looking strange at this stage, it will be shaped properly later.)
After the last row, you should have an almost bowl type shape. If not, smooth it all out, and arrange the rows evenly to create the bowl shape.
Twist both wire ends together. You’ve made your first petal.
Repeat this exactly the same 4 more times to create 5 petals.
Twist all 5 petals wires together.
Adding the centre:
Cut off approximately 20 cm of wire, thread the bead towards the centre, bend it in half.
Now just place it on top of the petal group, with one end of the wire between 2 petals on one side of the flower and the other between 2 petals on the opposite side.
Twist the wires on top of the other wires.
If you want a long stem, add a stem wire next to the twisted wires, and wrap around all stems with 32 gauge wire for a couple of centimetres. If you only want a very short stem, the wires all twisted together here should be fine.
The stem now needs to be covered in floral tape.
To use the tape, you need to stretch the first bit of it to activate the stickiness. Carefully wrap it very close to the flower part of the stem, stretch it down at an angle, and twist the stem until you reach the bottom, tear it off, and smooth it out.
Step 3:

Making the LEAF
Just make one leaf by following the leaf pattern as you did with the petal pattern. Twist the wires all the way down. Use floral tape, as you did before, but just for a couple of centimetres.
Use floral tape to attach the leaf to the stem.
Please
consider making a donation
Created by Augenia (Jenny) Lawson
https://craftcove.au/
For any questions, email me at: hello@craftcove.au
More tutorials can be found on the Craft Cove blog and in my Ravelry shop.
Please do not distribute, lend or copy any parts of this pattern.
Do not mass produce items made with this pattern.
Copyright © 2016 Augenia (Jenny) Lawson (Craft Cove)
Friday, April 24, 2009
Netted Star

NETTED STAR
Materials: 4mm crystals, or other beads
Size 10/0 seed beads
Stopper bead, any color, will be removed later.
Fine fishing line, approximately 80cm
Beading needle, or other fine needle
1. Thread the fishing line onto the needle
2. Tie on a stopper bead. A stopper bead is a bead the same size or smaller than the smallest bead you are using. String through it twice to hold it in place.
3. Add 6 seed beads, 1 crystal and 1 seed bead.
4. Go back through the crystal, and pull tight.
5. String on another 6 seed beads, a crystal, and this time 4 seed beads.
6. Go back through the first seed bead you strung on, through the same way you came from originally. Then back through the crystal.

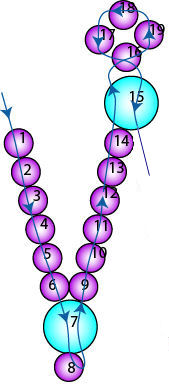
7. Continue in this manner, adding 6 seed beads between each section, crystals next to each end, and ends alternating between a single seed bead, and a 4 seed bead circle.
8. This should form a zigzag pattern with the 4 bead circles on one end, and the single beads on the other, as in the diagram.
9. Stop when you have 6 of each types of ends. 12 points all together.

10. The thread should now be coming out of the crystal, in readiness for the 6 seed bead centre. Now instead of starting a new 6 bead section, just string back through the first section, all the way through the first 6 seed beads, the crystal, and the end seed bead.
11. You should now have a rough circle. String through the next single seed bead, at the next point, then the next. Continue through them all. Then go through them all again.


12. Tie off, and thread through a few beads. Remove stopper bead, tie, and thread through a few beads.
Please
consider making a donation
Created by Augenia (Jenny) Lawson
For any questions, email me at: hello@craftcove.au
More tutorials can be found on the Craft Cove blog and in my Ravelry shop.
Please do not distribute, lend or copy any parts of this pattern.
Do not mass produce items made with this pattern.
Copyright © 2016 Augenia (Jenny) Lawson (Craft Cove)
Tuesday, April 21, 2009
Free Tutorials coming soon
I'll be moving all my free tutorials from my website to my blog soon.
I'll start with the oldest one, and gradually I'll be adding the brand new ones to the blog, rather than my web site.
These will be all my own creations and my own patterns.
Have fun
I'll start with the oldest one, and gradually I'll be adding the brand new ones to the blog, rather than my web site.
These will be all my own creations and my own patterns.
Have fun
Tuesday, May 27, 2008
Free Tutorials
Patterns & Tutorials
Here you'll find my free patterns and tutorials covering crochet, jewellery, beadweaving and other crafts.
All of the patterns and tutorials on this page are my own designs and are free to use for your personal crafting.
If you enjoy my patterns and tutorials and would like to support Craft Cove, donations are always very much appreciated.
Crochet


Jewellery
How to wear an ear cuff

Start at the top of the ear where the ear is thinner. Slide the cuff downwards over the cartilage, while turning it towards the front.
The cuff will sit from the outside of the ear, and over both sections of cartilage on the middle part of your ear.
Squeeze the ring section slightly, if necessary to get a snug fit. This is only necessary before the first use.

Subscribe to:
Posts (Atom)