Craft Cove Blog: crochet pattern
Showing posts with label crochet pattern. Show all posts

Wednesday, December 5, 2018

Hexagon Pattern One -US terms


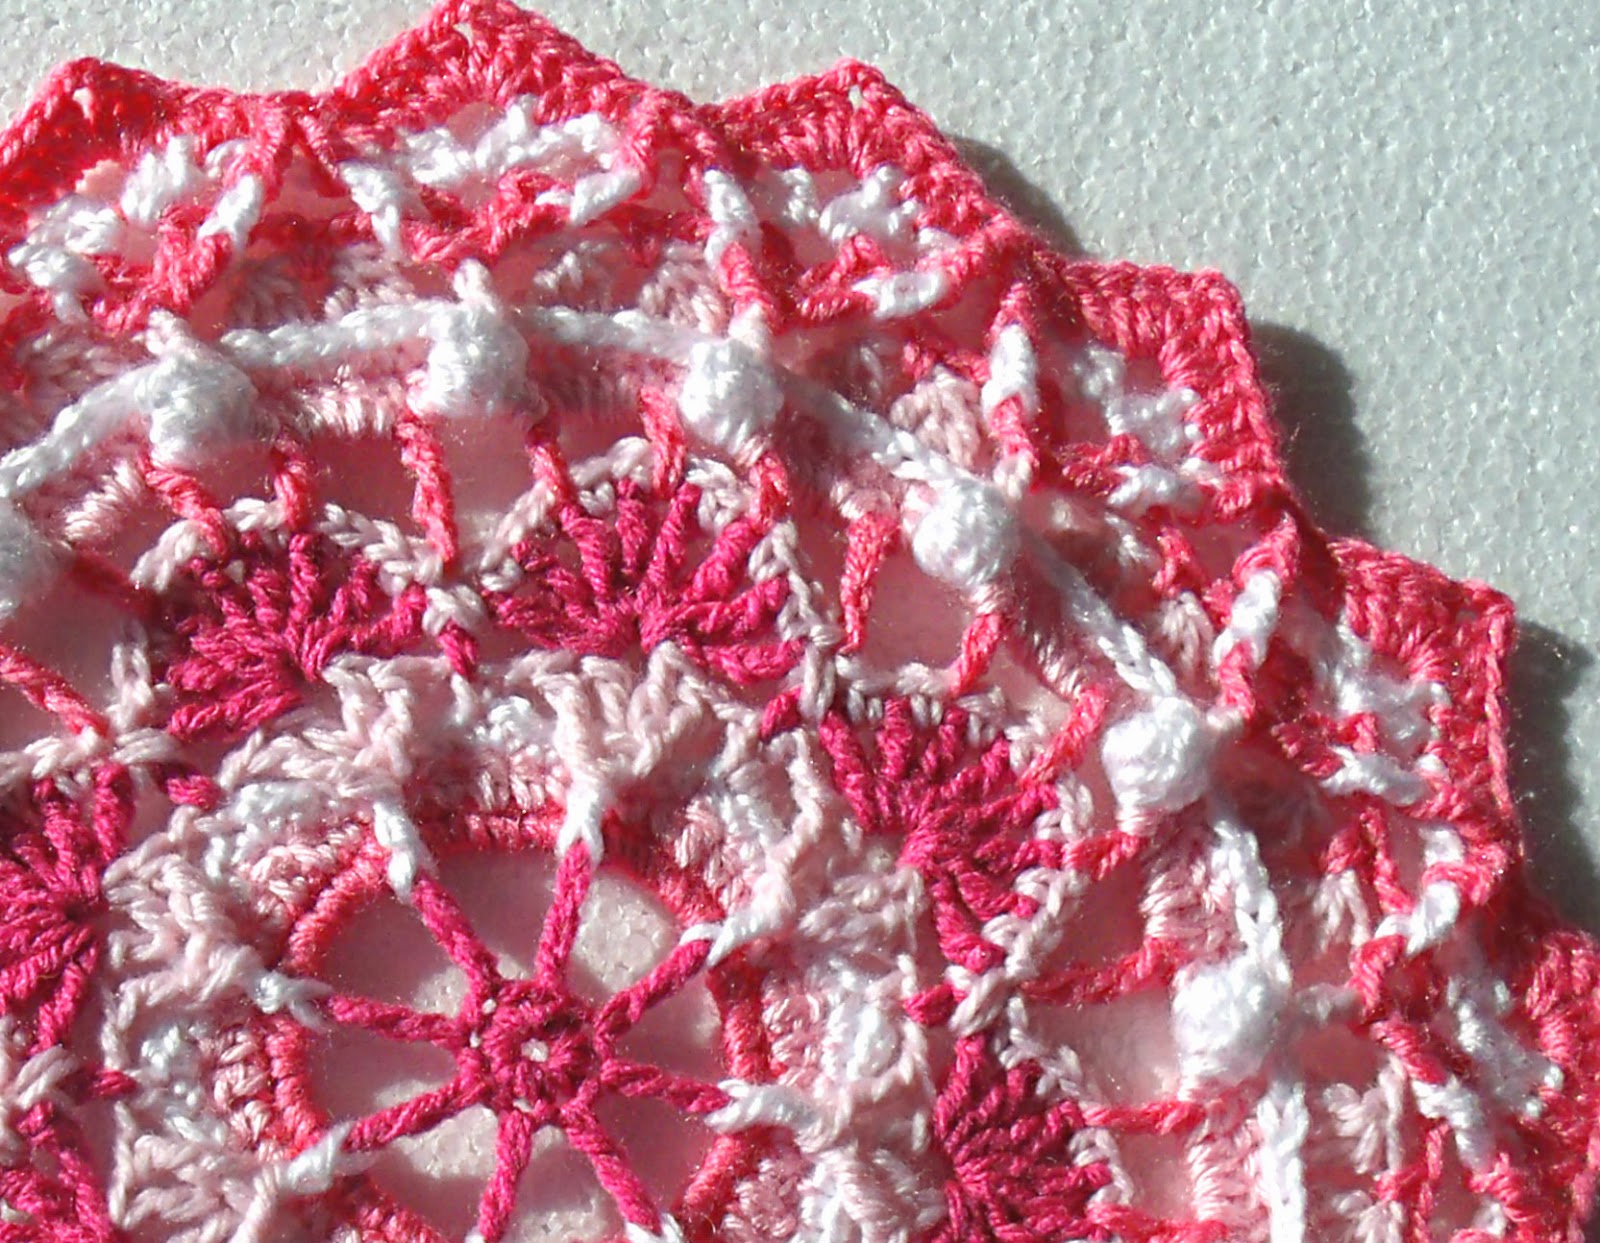
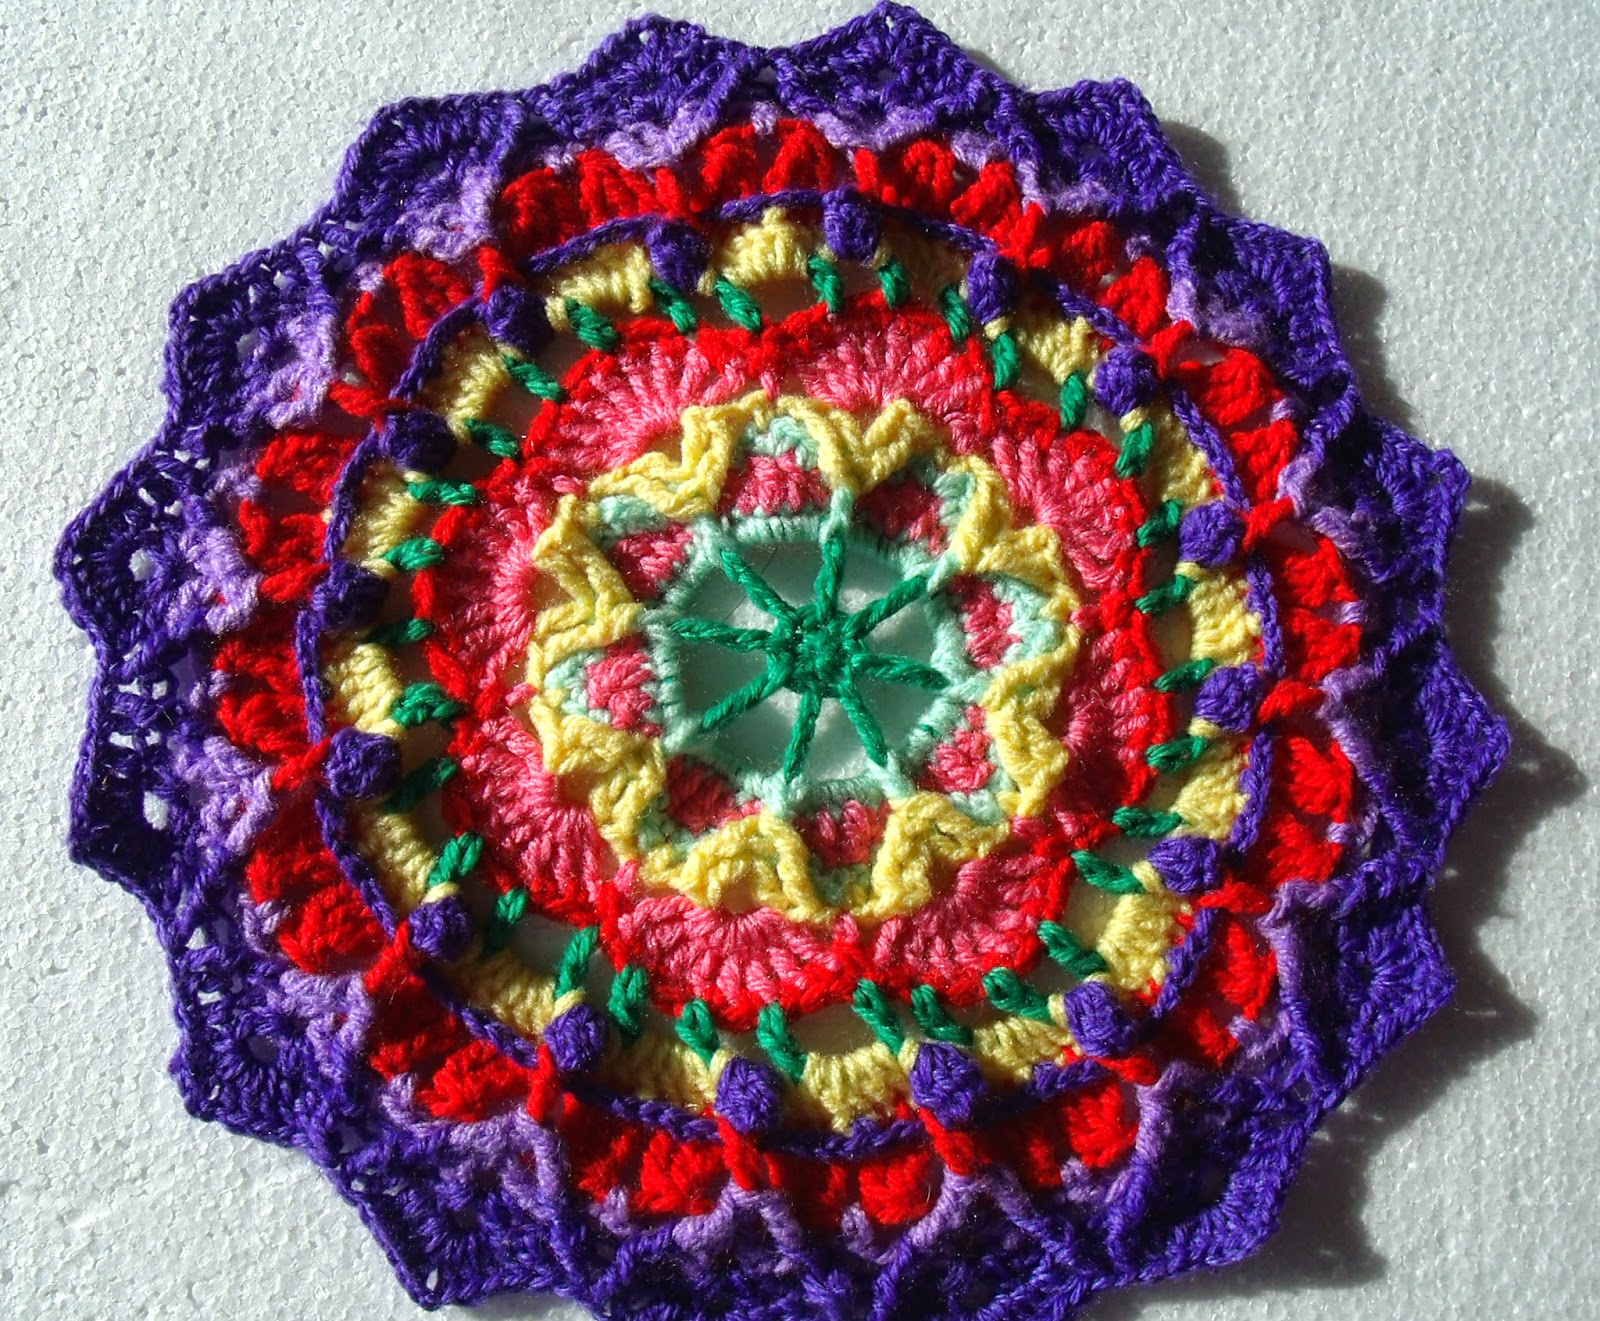
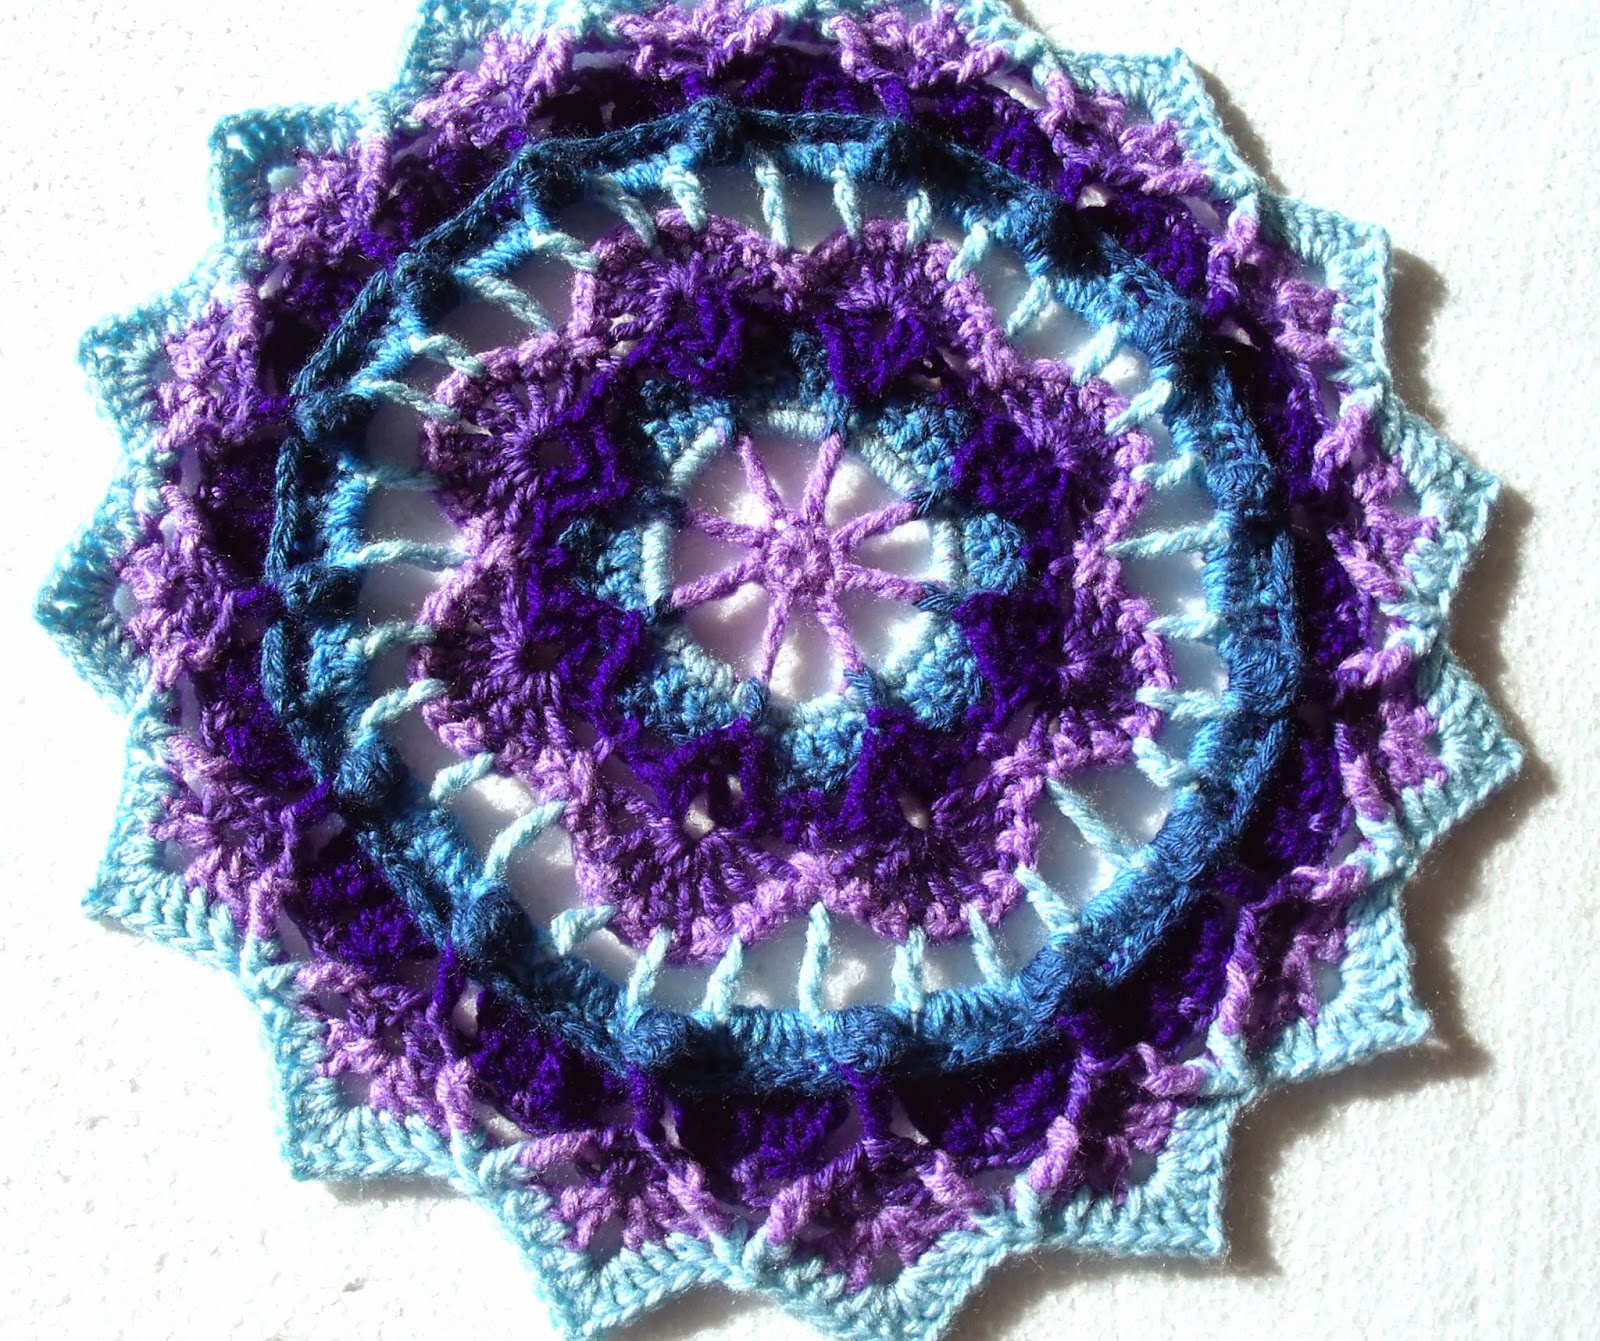
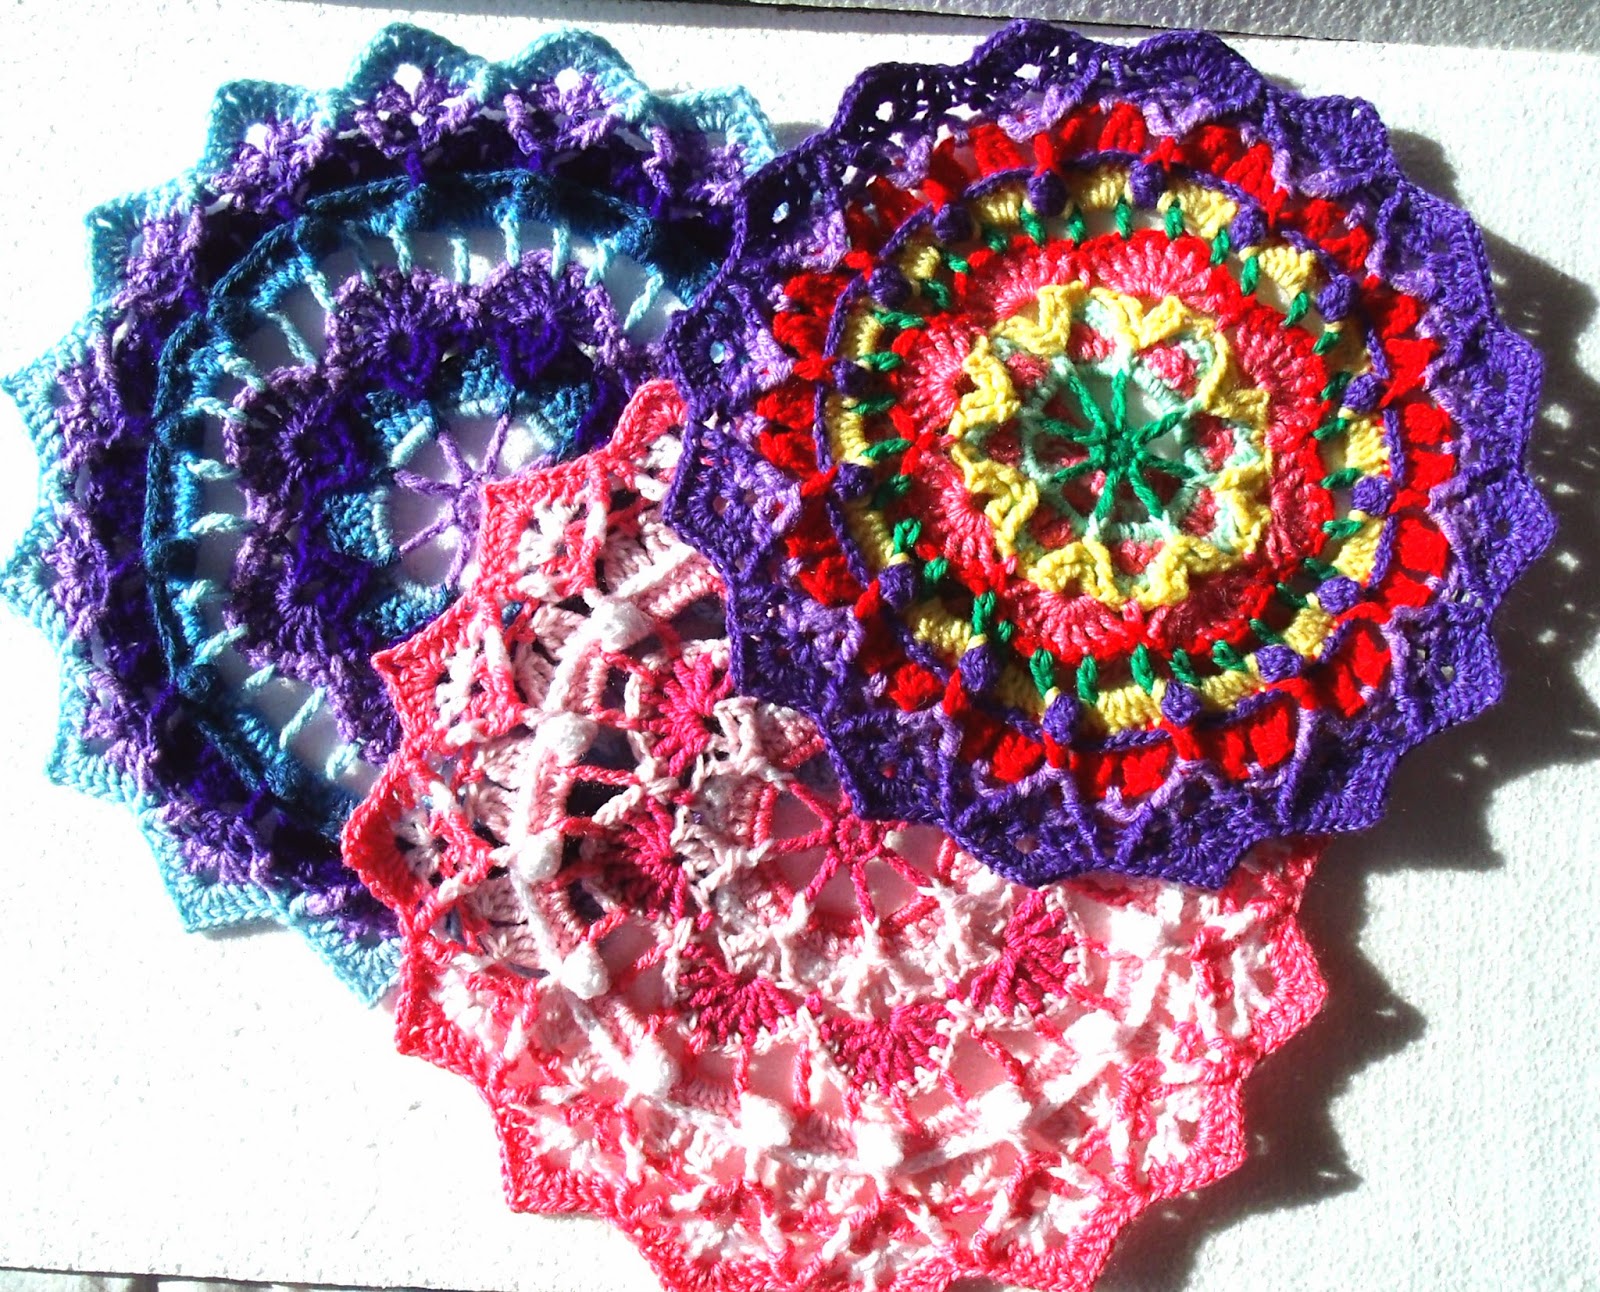
This pattern was created to make a blanket for a girl that was attacked terribly. I wanted to do something special for her, so I created a group to make hexagons to be joined together to make a blanket

Read more about it here:  https://craftcove.blogspot.com/2018/01/hexes-against-bullies.html


First I made this pattern. But decided it might be too much for every hexagon to be the same, and some people might find it too difficult. So I created another plain one. Pattern is here


This pattern is available to everyone for free. But I ask you not to share it, or claim it as your own, but feel free to share the link from here. I also ask you to please think about bullying, and the terrible effect it has on people, while making it


Want this as a printable pdf? Get it here for a small fee


Here it is in US terms, find UK terms here 


Hex 1 US terms


Pattern Terms: US
Yarn: 8 ply (DK/Light Worsted
Hook: 3.50 mm
Size: 19 cm


Special stitches used:


Puff stitch: yarn over, insert hook through stitch, pull up a long loop, repeat 4 more times in same stitch, yarn over, pull through all but last loop, yarn over, pull through all remaining loops. http://www.mooglyblog.com/puff-stitch-tutorial/

Split puff stitch: Work the same as puff stitch, but work three in first stitch, three in next stitch

Picot: 3 ch, slst in top of previous stitch

bpsc/bpdc/bptr: sc/dc/tr worked around the post of the stitch from the previous round. Insert hook from back to front in through the right side, and back to the back on the left side. http://www.mooglyblog.com/post-stitches-raisedrelief/

BLO: Back loop only, Normal stitches worked in the back look only, instead of the usual 2 loops. http://www.mooglyblog.com/front-loop-only-flo-and-back-loop-only-blo/

Shell stitch: (1 tr, 1 ch, 1 tr, 1 ch, 1 tr, 1 ch, 1 tr) all in the same stitch

Standing dc: attach a slst to hook, yarn around hook, hold tight, while working stitch normally. http://www.mooglyblog.com/standing-double-crochet-joining/

1 sc through picot -2 versions: version 1: insert hook through picot from back to front, poke hook down and back to the back, picking up one or 2 threads, work sc an usual
Version 2: fold picot forward, work through 1 or 2 stitchess in the back of picot


Round 1: MR, 6 sc. (Or 2 ch, 5 sc in first ch), slst into first st (6 scs)

Round 2: 3 ch (or 1 standing dc), 1 dc in 1st st, 2 dc in every other stitch around, slst into first st. Fasten off. (12 dcs)

Round 3: attach yarn to any stitch, 1 ch, 1 sc in each of next 2 sts, *5 ch, 1 split puff stitch across next 2 sts, 5 ch,** 1 sc in each of next 2 sts, rep from * all around, ending last rep at **, slst into first st (6 scs, 6 Ch 5s, 3 split puffs)

Round 4: 1 ch, 1 sc in same st, 1 sc in next st, *5 sc along side chains, 1 sc in top of st, 1 picot, 5 sc down other side**,1 sc in each of next 2 sts, rep from * all around, ending last rep at ** . slst into first st. Fasten off. (42 scs, 3 picots)

Round 5: BLO. Attach yarn to first sc from any pair, 3 chain, (or 1 standing treble, 1 ch), (1 tr, 1 ch, 1 tr, 1 ch, 1 tr) in same st, 1 picot, 1 shell st in next stitch, 2 ch, sk next 5 sc, 1 sc through picot (see special sts), 2 ch, sk next 5 sts, *1 shell st in next stitch, picot, 1 shell stitch in next stitch, 2 ch, sk next 5 sts, 1 sc through picot (see special sts), 2 ch**, rep from * all around, ending last rep at **slst into first st. Fasten off. (24 trs,3 picots, 12 ch, 3 sc through picot)

Round 6: Attach yarn to first st after any picot from round 5, 2 ch (or 1 standing bpdc), 1 ch, 1 bpdc in next st, 1 ch, 1 bptr in next st, 1 ch, 1 bptr in next st, *2 ch, 1 bptr in sc behind picot, 1 picot, 2 ch, 1 bptr in next st, 1 ch, 1 bptr in next st, 1 ch, 1 bpdc in next st, 1 ch, 1 bpdc in next st, 1 ch, 1 sc through picot (see special sts), 1 picot, 1 ch**, 1 bpdc in next st, 1 ch, 1 bpdc in next st, 1 ch, 1 bptr in next st, 1 ch, 1 bptr in next st**, rep from * all around, ending last rep at **, slst into first st. Fasten off. (12 bpdcs, 15 bptrs, 6 picots, 36 chs, 3 sc through picots)

Round 7: BLO, except in ch sts, Attach yarn to 1st st after tr with picot, 1 ch, 1 sc (or standing sc), *(1 sc in next ch, 1 sc in next st) 3 times, 1 sc in ch, 1 sc through picot (see special sts),(1 sc in next ch, 1 sc in next st) 4 times, 2 sc in next ch sp,1 sc through picot (see special sts), 2 sc in next ch sp**, rep from * all around, ending last rep at **, slst into first st. Fasten off. (24 blsc, 36 scs, 6 sc through picots)

Round 8: BLO, Attach yarn to 1st st after dc behind picot, 3 ch (or 1 standing dc), 1 dc in each of next 9 sts, *(1 dc, 2 ch, 1 dc) in st behind picot,**1 dc in each of next 10 sts. rep from * all around, ending last rep at **, slst into first st. Fasten off. (60 dcs, 6(1dc,2ch,1dc) cnrs)

Round 9: BLO, Attach yarn to 1st st after 2 ch, 3 ch (or Standing dc) *1 dc in next st, 1 puff st in next st, 1 dc in each of next 2 sts, 1 split puff st across next 2 sts, 1 dc in each of next 2 sts, 1 puff st in next st, 1 dc in each of next 2 sts, (1 dc, 2 ch, I dc) in corner,. rep from * all around, ending last rep at **, slst into first st. Fasten off. (48 dcs, 12 puff sts, 6 split puffs, 6(1dc,2ch,1dc) cnrs)

Round 10: Attach yarn to 1st st after corner 2 ch, 1 ch, 1 sc in same st (or standing sc) 1 sc in each of next 12 sts, *(1 sc, 2 ch, 1 sc) in corner 2 ch, 1 sc in each of next 13 sts**. rep from * all around, ending last rep at **, (1 sc, 2 ch, 1 sc) in corner 2 ch, slst into first st. Fasten off. (52 scs, 6(1 sc,2ch,1sc) cnrs)

Round 11: Attach yarn to 1st st after corner 2 ch, 3 ch (or 1 standing dc), 1 dc in each of next 14 sts, *(1 dc, 2 ch, 1 dc) in corner, 1 dc in each of next 15 sts,**. rep from * all around, ending last rep at **, (1 dc, 2 ch, 1 dc) in corner, slst into first st. Fasten off. (90dcs, 6(1dc,2ch,1dc) cnrs)

Round 12: Attach yarn to 1st st after corner 2 ch, 3 ch (or 1 standing bpdc), 1 bpdc in each of next 16 sts, *(1 dc, 2 ch, 1 dc) in corner, 1 bpdc in each of next 17 sts,**. rep from * all around, ending last rep at **, (1 dc, 2 ch, 1 dc) in corner, slst into first st. Fasten off. (102bpdcs, 6(1dc,2ch,1dc) cnrs)

Round 13: Attach yarn to 1st st after corner 2 ch, 3 ch (or 1 standing bpdc), 1 bpdc in each of next 18 sts, *(1 dc, 2 ch, 1 dc) in corner, 1 bpdc in each of next 19 sts,**. rep from * all around, ending last rep at **, (1 dc, 2 ch, 1 dc) in corner, slst into first st. Fasten off. (114 bpdcs, 6(1dc,2ch,1dc) cnrs)


 If you require pictures to help. Please download the pdf file here

Created by Jenny Lawson


For any questions, email me at: craftcove@gmail.com

More tutorials can be found at: Jewellery from Craft Cove http://craftcove.blogspot.com/


Please do not distribute, lend or copy any parts of this pattern.
Do not mass produce items made with this pattern.

Copyright © 2018 Jenny Lawson (Craft Cove)


Tuesday, January 23, 2018

Hexes Against Bullies


A couple of weeks ago I heard a terrible thing in the news.

An Australian girl committed suicide due to relentless online bullying.

I was shocked and horrified. So sad.


http://www.news.com.au/lifestyle/real-life/news-life/police-investigation-under-way-ahead-of-dollys-funeral/news-story/ebcbee59a67306acf292ed05a150577e


Sticks and stones can break my bones
But names can never hurt me


This is so not true. I've always known this personally. Words CAN hurt!  And VERY much


Then I was asked to join a facebook group of crocheters to create a hexagon, and have it joined to many other people's hexagons to create a lovely blanket to give to their family.

I thought it was such a lovely gesture. I was honoured to help


Then there was another story that shocked me to the core.


A teenage girl was assaulted viciously, she was tortured for 2 and a half hours while it was filmed.


http://www.theage.com.au/victoria/disabled-teenager-bashed-and-tortured-by-three-girls-after-being-lured-into-a-park-20180117-p4yyl0.html


This affected me so much because, while I know what it's like to be bullied, it was never physical.

This beaten girl was disabled. I know many disabled people, and used to work with them

This happened at Moe, a town in Victoria, Australia. The same town where I grew up

The girls doing the attack were 12 and 15!


I know these things have been happening since time began. But usually they happen when no-one else is around, and we don't get to see it.  We see the poor kid who was beaten up at school, he is black and blue with bruises. And we think, "poor boy, that is terrible"  Or they get told "Just ignore them"

This time it was there for us to see. And it was awful!


I decided I wanted to do something.

I decided I would also create a facebook group, where many people would come together and make hexagons. The hexagons would then be sent to me, where I would join them together into the blanket. Hexagons are a great shape to join together. And so much nicer than squares


The group started as Crochet for Kim. Then we made another blanket, with squares, for her sister. After that we decided to keep the group open to all crafters. It's now called Crochet and Crafts


Then I decided I may as well create the pattern for it too.

Of course I get carried away with patterns, and made it pretty fancy. So I decided I need to make an easier version too.


This worked perfectly. It would balance the fancy version, and the beginners can make it easily

And then I think I better create a chart too, for the visual learners. I find these tricky, but I did it. Then for lots of photos.


I have never created a pattern so quickly before. And I have never organised anything like this before.

A little overwhelming, but I have got a few helpers now. So far, so good

I can't wait to see it finished and Kim snuggled up in it. I hope it gives her comfort


Finally she received the blanket, and loved it


You can find the patterns here


Monday, February 6, 2017

One Week to go

Sunburst Mandala Cushion CAL

 one week to go


With just one week to go, you might want to make sure you have got all the items you need. But if you're ordering it, and it hasn't come in yet, don't worry, the first part is easy and quick. You'll catch up in no time.


Of course the main thing you'll need is the yarn (or wool, as we call all fibers in Australia).

The original pattern was designed with 8 ply yarn, which is DK in US.  I realize it's not easy to get this weight in America, so if you don't want to bother ordering it, you can just use Aran weight, worsted weight (10 ply), you'll have a larger cushion, but it will be lovely. You could also use a finer yarn, or even thread. I'd love to see them done this way.

I chose acrylic, because it's nice and cheap, easy to get in Australia, and it's so easy to wash and dry. It also blocks beautifully with steam. 

But if you prefer, you can use wool or cotton, or whatever your favorite fiber is.

There are 4 colors in this pattern. I originally designed it with yellows eg. white, pale yellow, medium yellow, and a deep yellow. I have also made it with white, pale grey, darker grey, and black. You can use four shades of a color, or choose any four colors you prefer.


If you're using 8 ply acrylic, you will need approximately 120 grams of the palest color, and 100 grams of each of the other colors.

You will also need a 3.25 mm crochet hook, and a 3.50 mm crochet hook.  Or larger, or smaller, depending on your yarn


You might also want to familiarize yourself with these special stitches. (But they really aren't difficult)


Special stitches used:

  • Front Loop Only (FLO). Work this stitch in the front loop only, leaving back loop free.
  • Back Loop only (BLO). Work this stitch in the back loop only, leaving front loop free.
  • Front loop double crochet (fldc). Front loop double crochet is a dc worked in the front loop only.
  • Back loop double crochet (bldc). Back loop double crochet is a dc worked in the back loop only.
  • Front loop treble (fltr). Front loop treble is a tr worked in the front loop only.
  • Back loop treble (bltr). Back loop treble is a tr worked in the back loop only.
  • Front post double crochet (fpdc). Front Post Double Crochet is worked around the front of the post of the stitch on the previous round. Insert hook through the right front and back out the left front, yarn around hook, pull through 2 loops.
  • Front post treble (fptr). Front Post Treble is worked around the front of the post of the stitch on the previous round. Yarn around hook, insert hook through the right front and back out the left front, yarn around hook, pull through 2 loops, yarn around hook, pull through last 2 loops.
  • Front post double treble (fpdtr). Front Post Double Treble is worked around the front of the post of the stitch on the previous round. Yarn around hook, twice, insert hook through the right front and back out the left front, yarn around hook, pull through 2 loops, yarn around hook, pull through another 2 loops, yarn around hook, pull through last 2 loops.
  • Back post double crochet (bpdc). Back Post Double Crochet is worked around the back of the post of the stitch on the previous round. Insert hook through the right back and back out the left back, yarn around hook, pull through 2 loops.
  • Back post treble (bptr). Back Post Treble is worked around back of the post of the stitch on the previous round. Yarn around hook, insert hook through the right back and back out the left back, yarn around hook, pull through 2 loops, yarn around hook, pull through last 2 loops.
  • Back post double treble (bpdtr). Back Post Double Treble is worked around the back of the post of the stitch on the previous round. Yarn around hook, twice, insert hook through the right back and back out the left back, yarn around hook, pull through 2 loops, yarn around hook, pull through another 2 loops, yarn around hook, pull through last 2 loops.
Don't be intimidated by these stitches, they're just basic stitches worked into different places.


And now you should be ready to start.


Get the pattern here:  http://www.ravelry.com/patterns/library/sunburst-mandala-cushion  (available 13th February)

Join in the discussion here:  http://www.ravelry.com/groups/craft-cove-crochet


Saturday, January 28, 2017

Sunburst Mandala Cushion CAL (Crochet-a-long)


Sunburst Mandala Cushion CAL


I will be hosting a CAL (crochet-a-long) for this lovely cushion I have created


The pattern utilizes a lot of back and front post stitches, as well as some front and back loop work. Knowledge of overlay crochet will be helpful

What is Overlay Crochet?

From http://www.lillabjorncrochet.com/p/overlay-crochet.html

"Overlay crochet is a relatively new technique. It was developed by an artist and fantastic jewelry maker Melody MacDuffee in the United States and first introduced in 2003. Melody MacDuffee started to spread her inventions and conducted lots of workshops for hundreds of crochet lovers.

Overlay crochet has its roots in Aran crochet. Though it may look a bit complicated and quite often is offered to advanced crocheters, in fact it uses ordinary crochet stitches, and only few special ones. To master this technique it is necessary to already know how to make a slip stitch, a chain, single, double and treble crochet stitches, how to increase the number of stitches, how to make a long stitch.

What is interesting about this technique is that with changing colors on every round it is possible to achieve an effect as if the colors are actually changed after every few stitches."


This cushion starts with a mandala created to look like a sunburst.


It is then encircled with a border, then changed into a square with a similar border


The back is made as a square with very simplified rays made with overlay crochet


The pattern will be available in sections. There will be 11 sections, a new one available each week, starting on February 13th. A new file will be added to the original file each week (Ravelry will send you a notification), at the end of the CAL, the whole CAL can be downloaded as one file


Clue 1: Monday, February 13th
Clue 2: Monday, February 20th
Clue 3: Monday, February 27th
Clue 4: Monday, March 6th
Clue 5: Monday, March 13th
Clue 6: Monday, March 20th
Clue 7: Monday, March 27th
Clue 8: Monday, April 3rd
Clue 9: Monday, April 10th
Clue 10: Monday, April 17th
Clue 11: Monday, April 24th

The pattern will be half price while the CAL is going. After the CAL is finished, the pattern will be available at full cost

Buy it here:
Sunburst Mandala Cushion Pattern   This pattern will be active on 13th February, 2017

Please join my Ravelry group http://www.ravelry.com/groups/craft-cove-crochet for help and conversations


Created by Jenny Lawson


For any questions, email me at: craftcove@gmail.com

More tutorials can be found at: Jewellery from Craft Cove http://craftcove.blogspot.com/

Please do not distribute, lend or copy this pattern.

Do not mass produce articles made with this pattern. 

Wednesday, June 1, 2016

Sale


http://www.ravelry.com/stores/craft-cove-designshttp://www.ravelry.com/stores/craft-cove-designs


Don't miss the sale on patterns


All my patterns are 25% off for this month only


Celebrate the start of winter


Just use the code "Winter"


http://www.ravelry.com/stores/craft-cove-designs


Monday, August 24, 2015

Newest Pattern


I've created this new doily pattern.

It is now available to buy on Ravelry, Craftsy, and Artfire


I created twisted loop sets, which I think is an entirely new stitch. I've never seen it anywhere before.

This doily also has bobbles and picots, and is made with a sort of pineapple pattern.


It can be made with one or two colours


Tuesday, September 2, 2014

Four Tone Spiral Mandala Pattern

My spiral mandala pattern has now been published


This pattern is made with 4 colours, or three if desired.  The spirals gradually get wider, then decrease again.


This pattern is available in US terms as well as UK/Australian terms.


Find it here:  http://www.ravelry.com/patterns/library/four-tone-spiral-mandala

And here:  http://www.artfire.com/ext/shop/product_view/CraftCove/9959663/four_tone_spiral_mandala_pattern/design/patterns/crochet/home_decor


Thursday, July 17, 2014

Floral Fantasy Mandala Pattern


 I've finished this pattern and had it tested.

It is now available from: http://www.ravelry.com/patterns/library/floral-fantasy-mandala

http://www.artfire.com/ext/shop/product_view/9709288

and
http://www.craftsy.com/pattern/crocheting/home-decor/floral-fantasy-mandala/103993


This pattern consists of a variety of stitches, creating a multi-layered textured effect.

All stitches used are explained thoroughly. Illustrations and photos are included throughout the pattern to help make everything clear.

This is great for stash busting. Use a different colour for each row, or make it all in one colour.

The finished product can be used as a doily, a wall decoration, cushion covers, and much more.


Add this

| More