This basic jewellery making article is a wonderful place to begin to learn all about the art of working with beads. It explains types of beading, and tools needed, perfect for a beginner.
Types of Basic Jewellery Making
Beaded Reindeer
Stringing: beads of all sorts of types and colours are strung onto a beading thread using pleasing designs and colours.
Beadweaving: this is sometimes known as seed beading. This includes a wide variety of weaves, including herringbone weave, brick stitch, peyote, netting, pondo stitch, right angle weave and square stitch. With the exception of two-needle right angle weave, these all require a needle and thread, and you weave in a similar way to sewing. Two needle right angle weave is usually not done with needles at all, a stiff thread is used, and the beads can be strung onto it without the use of a needle. There are also a huge range of spirals that can be made in all of the above weaves, as well as a few particular to spirals only. These include: Spiral rope, double spiral rope, triple spiral rope, flat spiral, Russian spiral, Dutch spiral, herringbone spiral, embellished right angle weave, Cellini spiral, Aussie spiral, netted spiral and African Helix.
Bugle spiral
Loom Beading: seed beads are woven into fabric using a loom. Some very intricate designs can be made.
Wire work and wire wrapping: This is where wire is used to created pleasing shapes and designs using wire.
wire work jewellery
Victorian Beading and French Beading: these methods ore often used to make beaded flowers. Wire is used, as well as seed beads. Victorian beading, also known as Continental Beading, is worked horizontally with both ends of the wire going through the row of beads. French beading is worked vertically with rows of beads worked around a central row of beads.
Victorian beaded spider
Chainmail: also known as chain maille. This is created by joining jump rings into intricate patterns.
Chainmail
What is a Bead?
Basic jewellery making usually includes beads. Basically a bead is a small decorative object that has at least one hole in it for threading. Beads have been used for jewellery for hundreds of thousands of years.
Beaded Bead
Beads can be made from all sorts of things, including: natural materials- such as bone, coral, seashells and nuts. They can also be made of synthetic materials such as: ceramics, glass, crystal and plastic.
Bead Types
Seed Beads: seed beads are the very tiny beads used in basic jewellery making and beadweaving. These are usually measured in either mm or aught sizes, eg. 11/0, which means number of beads per inch.
There are three main types of seed beads available:
* Japanese: these have a cylindrical shape and are very uniform in size. They have a large hole.
* Czech: these have more of a rounded shape with smooth edges. They’re sometimes described as being donut shaped.
* Chinese: these are the cheapest type of seed beads, but can be very uneven in shape and size. They are usually more Czech-shaped.
Beaded Brooch
Bugle beads: these are long cylindrical beads, made in a range of lengths.
Shaped beads: these are made in any sorts of shapes.
Faceted beads: these have been cut and polished to give lots of reflection and shine.
Tools and Materials Required for Basic Jewellery Making
The tools needed for basic jewellery making vary with what is being made and the technique used.
Some basic tools and materials are:
Thread: some available types are: tigertail, aculon, monofilament thread and Nymo.
Crimp beads: these are small soft metal beads with a large hole that are used to squash the thread together to hold the finding in place.
Findings: these are all the components used in basic jewellery making to make things into jewellery, includes clasps, earring hooks and key rings.
Pliers: these are need for many things in basic jewellery making, including closing crimp beads. Two are usually needed to close jump rings.
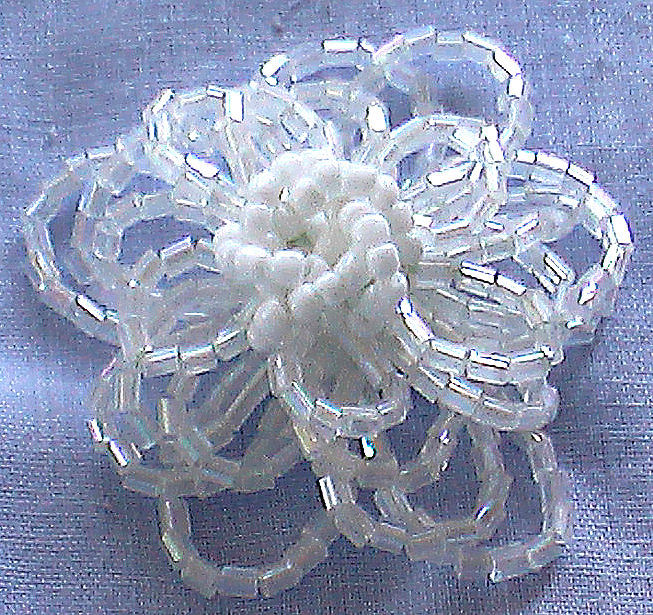
Flower Brooch
Specific tools and materials:
Stringing: generally you don’t need much at all. Just your beads and thread, you’ll also need a couple of crimp beads and a couple of jump rings. You’ll need pliers to close the crimp beads and jump rings. You’ll also need clasps or other findings for your basic jewellery making, depending on what you’re making,
Beadweaving: For this you’ll need fine thread, beading needle, seed beads. You’ll also need the crimp beads and other findings the same as with stringing, depending on what you’re making.
Loom Beading: loom, thread and seed beads, and findings as required.
Wire work and wire wrapping: The wire can be craft wire, artistic wire, copper wire, or sterling silver wire. They are available in different gauges that measure the thicknesses. You will need pointy nosed pliers, and round nosed pliers to create spirals and loops. Wire cutters are required to cut the wire.
Saint Bernard
Victorian Beading and French Beading: Seed beads and wire are required for these. Pointy nosed pliers will be needed. If it’s going to be a flower, you’ll need a stiffer wire for the stem and some floral tape to wrap it.
Chainmail: This just requires lots of jump ring available in different sizes and gauges, as well as 2 pairs of pliers to close the rings. You’ll also need the findings as required.
150cm fishing line,
100 gold size 8/0 hex beads (also known as 2 cut beads)
200 red size 8/0 seed beads
35 black size 8/0 seed beads
1 ivory 6mm imitation pearl
Techniques: Beadweaving, right angle weave
Difficulty: Medium, knowledge of right angle weave is required
Step 1: Ball base: Start with 5 beads, crossover on the last one (bead 5)
Step 2: Add beads 6, 7, 8 and 9 onto the blue thread. Cross through bead 9 with the green thread.
Step 3: Add beads 10, 11 and 12 onto the green thread. Cross through bead 12 with the blue thread.
Step 4: Add beads 13, 14 and 15 onto the blue thread. Cross through bead 15 with the green thread.
Step 5: Add beads 16, 17 and 18 onto the green thread. Cross through bead 18 with the blue thread.
Step 6: Pass the green thread through beads 1 and 6.
Step 7: Add beads 19 and 20 on the blue thread. Cross the green thread through bead 20.
Step 8: Pass the blue thread through bead 7.
Step 9: Add beads 21, 22 and 23 on the green thread. Cross the blue thread through bead 23
Step 10: Pass the green thread through beads 8 and 10.
Step 11: Add beads 24 and 25 to the blue thread. Cross the green thread through bead 25.
Step 12: Pass the blue thread through beads 11 and 13.
Step 13: Add beads 26 and 27 on the green thread. Cross the blue thread through bead 27
Step 14: Pass the green thread through beads 14 and 16.
Step 15: Add beads 28 and 29 to the blue thread. Cross the green thread through bead 29.
Step 16: Pass the blue thread through beads 17, 19 and 21.
Step 17: Add bead 30, and cross over.
Step 18: Take the blue thread and pass through beads 28 and 26.
Step 19: Take the green thread and pass through beads 22 and 24.
Step 20: Tie off, but leave the thread. The base is done. It should look like a ball with lots of holes.
Now you will add the petals.
The diagram shows where the petals need to be added, basically there will be 3 rows on the beaded base. The first and last rows will have 5 beads, the middle row will have 10 beads.
Step 21: For the first row, just pass ONE thread through the bead next to it. You will be working with this thread only for now. And you will be working on this circle of 5 beads, which will be outer row of petals, and is highlighted in yellow.
Step 22: Thread on 20 gold hex beads, and then pass the thread back through the bead on the base where you started, to create a loop of beads. (The thread path for the first row of petals is shown in the diagram). Pass the thread into the next bead in the circle, add 20 gold hex beads, and loop it back through again. Continue this all the way around the circle of 5 beads on the base.
Step 23: At this stage I like to add a brooch back, if I’m using one, then tie off the thread.
Step 24: Now pick up the other thread and pass it through to a bead in the next row. This second row is highlighted in pink, and will have 10 beads in it. Note: this row of beads doesn’t sit perfectly straight, but has a slight zigzag pattern to it.
Step 25: This time add loops of red size 8/0 beads, I used 20 because the seed beads are smaller than the hex beads, but play it by ear these loops should be a little smaller than the loops in the last row. Make this row like before, passing through a bead, adding the beads for the petals, and passing back through that bead, then pass into the next bead. Continue all the way around forming 10 overlapping petals.
Step 26: Now you’ll be up to the last row, which will have only 5 beads in it again. This row is highlighted in green. This time add only 7 black seed beads to each of the five beads on the base.
Step 27: To make the flower centre, bring the thread from the bottom of the work up through the centre of the base, add the pearl bead, and cross the other thread through the pearl. Pass each thread through a bead near it, as in the diagram.
Weave the threads through some beads until the threads meet. Tie off and cut.
Your beaded flower is now finished!
VARIATIONS: You can use seed beads or any other beads in any of the rows, but each inner row just needs to be a little smaller than the outer ones. You can also leave out the centre pearl, to give a different look to your flower.
All of these patterns I've created myself from my own original designs unless stated otherwise.All these tutorials are free for you to use, but not to copy, sell or distribute. If you feel like making a donation I would be very grateful.
Donations are very easy to do through Paypal, and you don't even have to sign up.


