A HUGE 10% DISCOUNT OFF ALL ITEMS! NOT TO BE MISSED!
Craft Cove is having a sale. This months special is for 10% off EVERY item in my jewelry store!
Craft Cove has a huge collection of unique handcrafted jewelry and gifts for sale. Including beadweaving, chainmail jewellery and wirewrapping. There are necklaces and chokers, bracelets, earrings, 3d ornaments and animals, keyrings, even amulet bags, all in many different types of weaves.
Everything in Craft Cove is entirely handcrafted by Jenny Lawson here in Australia.
For all of May EVERY item is discounted by 10%. Only till the last day of May, so don't miss out.
http://craftcove.weebly.com
craftcove@gmail.com
Showing posts with label beadweaving. Show all posts
Showing posts with label beadweaving. Show all posts
Friday, May 1, 2009
Friday, April 24, 2009
Free Star Tutorial
Here is the first of the tutorials.

NETTED STAR

Materials: 4mm crystals, or other beads
Size 10/0 seed beads
Stopper bead, any color, will be removed later.
Fine fishing line, approximately 80cm
Beading needle, or other fine needle
1. Thread the fishing line onto the needle
2. Tie on a stopper bead. A stopper bead is a bead the same size or smaller than the smallest bead you are using. String through it twice to hold it in place.
3. Add 6 seed beads, 1 crystal and 1 seed bead.
4. Go back through the crystal, and pull tight.
5. String on another 6 seed beads, a crystal, and this time 4 seed beads.
7. Continue in this manner, adding 6 seed beads between each section, crystals next to each end, and ends alternating between a single seed bead, and a 4 seed bead circle.
8. This should form a zigzag pattern with the 4 bead circles on one end, and the single beads on the other, as in the diagram.
9. Stop when you have 6 of each types of ends. 12 points all together.

10. The thread should now be coming out of the crystal, in readiness for the 6 seed bead centre. Now instead of starting a new 6 bead section, just string back through the first section, all the way through the first 6 seed beads, the crystal, and the end seed bead.
11. You should now have a rough circle. String through the next single seed bead, at the next point, then the next. Continue through them all. Then go through them all again.


12. Tie off, and thread through a few beads. Remove stopper bead, tie, and thread through a few beads.

NETTED STAR
Materials: 4mm crystals, or other beads
Size 10/0 seed beads
Stopper bead, any color, will be removed later.
Fine fishing line, approximately 80cm
Beading needle, or other fine needle
1. Thread the fishing line onto the needle
2. Tie on a stopper bead. A stopper bead is a bead the same size or smaller than the smallest bead you are using. String through it twice to hold it in place.
3. Add 6 seed beads, 1 crystal and 1 seed bead.
4. Go back through the crystal, and pull tight.
5. String on another 6 seed beads, a crystal, and this time 4 seed beads.
6. Go back through the first seed bead you strung on, through the same way you came from originally. Then back through the crystal.


7. Continue in this manner, adding 6 seed beads between each section, crystals next to each end, and ends alternating between a single seed bead, and a 4 seed bead circle.
8. This should form a zigzag pattern with the 4 bead circles on one end, and the single beads on the other, as in the diagram.
9. Stop when you have 6 of each types of ends. 12 points all together.

10. The thread should now be coming out of the crystal, in readiness for the 6 seed bead centre. Now instead of starting a new 6 bead section, just string back through the first section, all the way through the first 6 seed beads, the crystal, and the end seed bead.
11. You should now have a rough circle. String through the next single seed bead, at the next point, then the next. Continue through them all. Then go through them all again.


12. Tie off, and thread through a few beads. Remove stopper bead, tie, and thread through a few beads.
Please
consider making a donation
Created
by Jenny Lawson
For
any questions, email me at: craftcove@gmail.com
More
tutorials can be found at: Jewellery from Craft Cove
http://craftcove.blogspot.com/
Please
do not distribute, lend or copy.
Do
not mass produce.
Copyright
2016 Jenny Lawson
Tuesday, April 21, 2009
Free Tutorials coming soon
I'll be moving all my free tutorials from my website to my blog soon.
I'll start with the oldest one, and gradually I'll be adding the brand new ones to the blog, rather than my web site.
These will be all my own creations and my own patterns.
Have fun
I'll start with the oldest one, and gradually I'll be adding the brand new ones to the blog, rather than my web site.
These will be all my own creations and my own patterns.
Have fun
Thursday, April 9, 2009
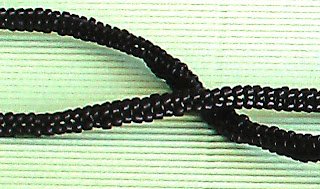
Freeform Madness
 |
| freeform bracelet |
I'm giving the spirals a rest for a while. The cellini and Dutch spirals are both being made into necklaces so they take a little while to do. I find it helpful to take a break from work that takes too long, if I don't have a timetable for it, then I can come back to it fresh, or just do little bits as it takes my fancy.
I finished the other spiral rope which is really an embellished right angle weave. I wasn't too happy with it, so I gave it to my daughter, and tried different beads. More on this next time.
I've never done any freeform work before, so I thought I'd give this a go. It was a bit scary at first, the base was a bit crooked, but they say it's supposed to! Then I wasn't sure if everything should sit flat against the base. And I wasn't sure what to put where, or how to do it.
 |
| freeform beading |
I started putting the bigger beads on, then gradually added some bridges, and I wasn't really sure this was going to work, it didn't look so good. I thought I'd just keep going, I added more beads, more bridges, then I was on a roll. All of a sudden it was taking shape. I added more of this and that. By now I loved doing it and I kept thinking of more interesting things to do with it. And believe it or not, I actually loved the look of it! Bummer! I promised my daughter she could have it, when I wasn't so sure how good it would look.
Anyway, I've nearly finished it. So I'll take a photo to post before she has it. But I'll definitely make some more. I'll post the photos of it next time.
 |
| freeform beading |
Tuesday, May 27, 2008
Free Tutorials
All of these patterns I've created myself from my own original designs unless stated otherwise.All these tutorials are free for you to use, but not to copy, sell or distribute. If you feel like making a donation I would be very grateful.
Donations are very easy to do through Paypal, and you don't even have to sign up.

Cyclone Swirl
http://craftcove.blogspot.com.au/2016/10/cyclone-swirl.html
 Blocking and stiffening crochet
http://craftcove.blogspot.com.au/2014/01/blocking-and-stiffening-crochet-items.html
 Crochet Baby Crocs - Updated and Improved
http://craftcove.blogspot.com.au/2013/07/free-crochet-baby-crocs-pattern.html
How to wear an ear cuff
 Herringbone Rope
http://craftcove.blogspot.com/2011/05/free-herringbone-rope-tutorial.html
Basic Jewellery Making
http://craftcove.blogspot.com/2010/07/basic-jewellery-making.html
Information for beginners can be found here
Different pattern type instructions
http://craftcove.blogspot.com/2010/07/instructions-for-following-3d-chart.html

More Tutorials
http://3dbeading.com/
 Victorian Beaded Flower
http://craftcove.blogspot.com/2009/08/victorian-beaded-flower-tutorial.html

Filled in heart
http://craftcove.blogspot.com/2009/05/filled-in-heart-tutorial.html

3 tier beaded flower
http://craftcove.blogspot.com/2009/05/3-tier-beaded-flower.html

Netted star
http://craftcove.blogspot.com/2009/04/free-star-tutorial.html
See more tutorials here: http://craftcove.blogspot.com/2010/09/more-tutorials.html
Donations are very easy to do through Paypal, and you don't even have to sign up.

Cyclone Swirl
http://craftcove.blogspot.com.au/2016/10/cyclone-swirl.html
http://craftcove.blogspot.com.au/2014/01/blocking-and-stiffening-crochet-items.html
http://craftcove.blogspot.com.au/2013/07/free-crochet-baby-crocs-pattern.html
How to wear an ear cuff

Start at the top of the ear where the ear is thinner. Slide the cuff downwards over the cartilage, while turning it towards the front.
The cuff will sit from the outside of the ear, and over both sections of cartilage on the middle part of your ear.
Squeeze the ring section slightly, if necessary to get a snug fit. This is only necessary before the first use.

http://craftcove.blogspot.com/2011/05/free-herringbone-rope-tutorial.html
Basic Jewellery Making
http://craftcove.blogspot.com/2010/07/basic-jewellery-making.html
Information for beginners can be found here

Different pattern type instructions
http://craftcove.blogspot.com/2010/07/instructions-for-following-3d-chart.html
More Tutorials
http://3dbeading.com/

http://craftcove.blogspot.com/2009/08/victorian-beaded-flower-tutorial.html

Filled in heart
http://craftcove.blogspot.com/2009/05/filled-in-heart-tutorial.html

3 tier beaded flower
http://craftcove.blogspot.com/2009/05/3-tier-beaded-flower.html

Netted star
http://craftcove.blogspot.com/2009/04/free-star-tutorial.html
See more tutorials here: http://craftcove.blogspot.com/2010/09/more-tutorials.html
Subscribe to:
Posts (Atom)